Build Automation (CICD)
Overview
Continuous integration (CI) is the process of integrating
your code into a shared repository as frequently as possible. During code
integration, a build break or a test failure can inform you, in a timely
manner, of an error in your code.
When many developers collaborate on complex software
projects, it can be a long and unpredictable process to integrate different
parts of code together. However, you can make this process more efficient and
more reliable if you build and deploy your project continuously.
Visual Studio Team Services simplifies Continuous
Integration for your applications regardless of what platform you are
targeting, or what language you are using. VSTS Team Build allows you to:
Ø
Build on Linux, Mac, and Windows
Ø
Use a private or a hosted (Azure) build agent
Ø
Use multi-platform build agents for Android,
iOS, Java, .NET, and other applications
Ø
Seamless integration with work, test, code, build,
and release
Ø
Track your builds with real-time build status
Visual Studio Team Services account. If you don’t have one,
you can create from here
Build Definition
Note: For defining build, user should be in the SG
group ('Microsoft IT Build Admins').
2. From
your VSTS account overview page, select your team project.
3. Click
on Build and Release tab and then
select Builds.

4. Click
on New to create a build definition.

5. Select
Source, Team Project, Repository and Default branch based on your application
and click on Continue.

6.  You will be asked to choose a template. Select Empty Process.

Here we can select with the predefined templates which has
applied a set of tasks that are typically involved in building an app. In many
cases, we might not require doing anything further other than just pointing to
the correct repository and branch and we will be good to go.
In our case, we have selected empty process as we are
creating build definition for web job.
7. Select
the Process task, here we need to
select the build agent where we want to run this build. We can choose to run
the builds on an-premise agent or use the agents hosted on Azure. We will use
the Hosted VS2017/Hosted agent as it
has the .NET core framework and all other components that are required to build
the app.
Select the Agent queue as “Hosted” if solution is built on VS 2015, If It is compatible with
VS2017 then select “Hosted VS 2017”

8. To
rename the build definition, click on the name, edit the name and then save the
build definition by clicking on Save & queue.

Adding Build Tasks
To add build task, select the plus sign (+) from
Phase 1 on the left side.

NuGet
1.
Search for NuGet
and click on Add.

2.
Select NuGet added under Phase 1 tab
3.
Define properties for NuGet task as below:
Display name: user defined name
Path to solution: select the solution file from repository
Command: Restore
Display name: user defined name
Path to solution: select the solution file from repository
Command: Restore

Visual Studio Build Task
1.
Now we need to add another task, click on (+) on
phase 1 and Search for Visual Studio
Build task and click on Add

2.
Define the properties as below:
Display Name: user defined name.
Visual Studio Version: Select VS based on application compatibility. In this case we have
selected Visual Studio 2015.
Advanced settings: Check Record Project Details and Create Log File.
Solution: For the solution file, select the ... button to browse your repository
and select the solution file you created.
For Single
Project in Single Solution:

Note: When we have multiple projects in our solution, we need to add vs build task in Build Order (Check VS, in which order solution getting build)
For Multiple Projects in Single Solution:


3.
Select Save & queue, and then
select Save. (If popup asks to select a folder to save, we can skip that
by clicking on cancel)
4.
Final
build looks as below,


Copy Files
1.
To add another task, click on (+) on phase 1 and
Search for Copy Files task from the
**Deploy/All section and click on Add.

2.
Change the property values as below and save the
definition
Display Name: any name which is relevant to our application.
Source Folder: DemandManagement/DemandManagement.Job/bin/
(In our case we have given bin folder of webjob)
Contents: **
Target Folder: $(build.artifactstagingdirectory)\TimeTrackerDev\App_Data\jobs\triggered\DemandManagementJob2018 (We can get the Target folder path from VS while we are deploying our Webjob from VS)


For more information regarding Copy Files check below URL.
Publish Build Artifacts
1.
To add another task, click on (+) on phase 1 and
Search for the Publish Build Artifacts
from the All section. Click on Add.

2. Define
properties to the Publish Build
Artifacts as below:
Display name: application relevant name.
Path to publish: $(Build.ArtifactStagingDirectory)
Artifact name: drop (We can change this name – all the code files will be created
under this folder once the job ran successfully)
Artifact publish location: Visual Studio Team Services/TFS
Display name: application relevant name.
Path to publish: $(Build.ArtifactStagingDirectory)
Artifact name: drop (We can change this name – all the code files will be created
under this folder once the job ran successfully)
Artifact publish location: Visual Studio Team Services/TFS

You are ready to run the build. You can make the builds to
run as a Continuous Integration build so that it runs upon every check-in on
the branch. We will see that later in the lab. For now, we will run it
manually.
3. Select Save
& queue, and then select Save.
4. Then
click on Queue, as shown below.

Start Build

You will see that the
build waiting to find an agent to run. It may take a couple of minutes and once
it gets an agent, the build starts executing. You can see the output logs in
real-time as the build is running. You can also download the log later should
you need to a deeper analysis.

Once all the steps are completed, you can select the Build
number on the top to get the detailed information on the run. The Summary tab
shows the summary of the run including the who triggered it, at what time, what
code and commit was fetched, associated work items, tests, etc.

The Timeline view
will help you find out how much time did every task to run.(below image is as
per new UI).

If the build
definition included publish task and if any files were published, you can find
it from the Artifacts tab.

Once we explore the file we will get all type of file like
.dll, exe etc. Please find below screenshot.

We can find the Build definition as below

Enable CI
Click on Triggers.
On the Triggers tab you specify the events that will trigger the build. You can
use the same build definition for both CI and Scheduled builds.
Continuous
integration (CI): Select this trigger if you want the build to run whenever
someone checks in code.
Check the Enable Continuous integration checkbox and select the branch filters

Release Definition
2. Click Build and Release tab and select Releases.

3.
Select the plus sign (+) and
then select Create release definition.

4.
Select the action to start with an empty process.

5. In Next Window, Provide Environment Name like UAT,
Production and click on save.

6.
Rename the release definition by clicking on the
name then save the build definition again.

Click on Pipeline from the Menu

7.
From the
Artifacts panel, click on (+) Add.

8.
Select
the Source type as Build, Project as OneITVSO and select the build definition
which we have created from the Source (Build definition)

9.
After
selecting the build definition, it will be loaded with build definition values
and then click on Add.

Select the Lightning bolt to trigger continuous deployment and
then enable the Continuous deployment trigger on the right-side
callout popup.
It creates a new release every time a new build is available.

*We can add
Filters if requires.

10.
Click on Schedule set, enable the Schedule release trigger from the
callout popup and configure the time. This will create a new release at
specified times. (We are not using this)

11.
Now we need to define the tasks for release definition.
Click on Tasks from menu or click on
1 phase, 0 task from Environment.

12.
Select the Agent
Phase, here we need to select the Agent queue where we want to run this release
definition. Select the Agent queue as “Hosted” if the solution
is built on VS 2015 and if it is compatible with VS2017 then select “Hosted VS
2017”

Adding Release Tasks
1.
Select Agent Phase and click on (+) to add Task

2. Search
for AzSK Security Verification Tests task
and add the same to Agent Phase.

3. After
adding the Security Verification task, we can find the screen as below

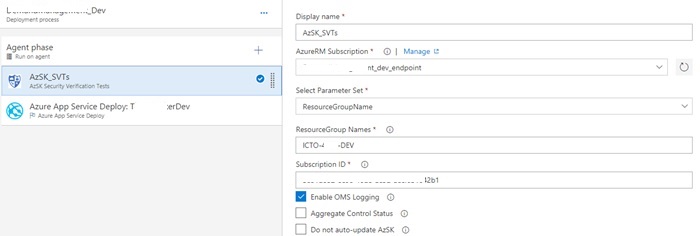
4. Provide
the values for Security verification task as described below:
Display Name: Change if you require
Select parameter set: ResourceGroupName(after selecting the ResourceGroupName,
it will ask for the Name of the Resource Group where
WebApp(App Service) exists)
Subscription Id: Provide the Subscription ID of your Resource Group
AzureRM Subscription: See In below note steps.
AzureRM Subscription
Click on Manage hyper link and it will open another page in
new tab
From the newly opened window, we need to create End point
a. Click on New Service Endpoint
b. Select Azure Resource Manager from populated values

c. Provide the connection name with relevant to your application
d. Select the subscription id from subscription drop.
e. Resource Group name of your application from Resource Group dropdown
then click on “use the full version of the endpoint dialog”

f. Once you click on the link, it will ask for some more details as shown below:

g. Provide the below Information:
Service Principal Client ID: we need to provide Service Principle Client ID which
was enabled for our Web App in Azure.

Service Principal Key: We need to provide the Principle Key , We can create a new
Key, if we forget the existing one. Make sure to save the key
value as there isn’t any option to retrieve key value if it’s lost.

Note:
After providing Principle Client ID and Key make sure to verify the connection
by clicking on Verify Connection.
by clicking on Verify Connection.

We need to select the End
Point which we have created in above steps, for AzureRM subscription under Security
verification task

Finally, Security Verification task looks as below:

5. Search
for Azure App Service Deploy task
and add the same to Agent Phase.

6. After
adding the task, we need to configure settings.

7. Click on
the Azure App Service Deploy and
provide the properties as below:
Display name: Name of the deployment task.
Azure Subscription: We need to select the End Point which we have created earlier.
AppType: Web App
Display name: Name of the deployment task.
Azure Subscription: We need to select the End Point which we have created earlier.
AppType: Web App

App Servicename: Based on End Point configuration and app type, it will be
autopopulated with Web App. Select the Web App where we
want to deploy the webjob.

Package or folder: Initially, we will get a path with .Zip, click on … from right-side.

8. In Next window, we need to select the Webjob,
which we want to deploy to Web App.

Package and folder will looks as below:

We haven’t done any changes to below configuration properties

9. After
defining artifact and environment save the release definition. To create a new
release in manually follow below steps:
a.
Click on Create
release from Release

b.
Select the Environment and Build ID and click on
Create.

c.
Now, it will open release summary page. Click on
Deploy and select the Environment to start deployment to Web App.

d.
Release definition summary is shown below:

e.
Click on logs to find the logs of release definition.

f.
Navigate to your web job section in Web App to
find the WebJob which was deployed using Build Automation.

If we want to trigger another deployment to another environment,
follow the below steps.
i.
Click on Pre-deployment conditions as shown below.

ii.
Click on After release from trigger and save release definition.

Scheduler
Once you have deployed, your WebJob is ready to run. What
you need is a scheduler to trigger it on a scheduled basis.
Now to schedule the Web Job we need to create a Scheduler
Job.
To create a Scheduler Job, follow the steps below:
a. Open Microsoft Azure Portal and navigate to Scheduler Job Collections.
b. Click on Add.
To create a Scheduler Job, follow the steps below:
a. Open Microsoft Azure Portal and navigate to Scheduler Job Collections.
b. Click on Add.

c. Create a new Job inside Job Collection and provide the required details like Name, Pricing Tier,
Resource Group etc.

d. Next step is to configure the Action
settings, wherein we will trigger our Web Job. For this we
need to define Action as Https, Method as Post and the URL
need to define Action as Https, Method as Post and the URL

Format of the URL should be like –
https://{userName}:{password}@{WebAppName}.scm.azurewebsites.net/api/triggeredwebjobs/{WebJobName}/run
To get the above details open the Web Job properties

Replace the
appropriate values
e.
Last step is to schedule it. Here we have selected it to run
immediately, every 2 minutes for
total of 10 occurrences.
total of 10 occurrences.

f. Finally click on Create which will create the job.

We can monitor our Job

Going back to our Web Job Logs we can see it ran 3 times
with interval of 2 minutes till that point

0 comments:
Post a Comment